Building an Adaptive Intrusion Detection System: A Step-by-Step Guide to SnortML and Agentic AI
Introduction
The traditional approach to intrusion detection has long relied on signature-based methods—matching network traffic against a database of known attack patterns. While effective against known threats, this approach struggles with novel attacks and variations. The emergence of machine learning (ML) and agentic AI is transforming the field, shifting the core question from "does this match a known pattern?" to "does this actually make sense in context?" This guide walks you through implementing a modern intrusion detection system (IDS) that combines Snort with SnortML and autonomous agents, enabling dynamic, context-aware threat detection.
What You Need
- A Linux-based host (Ubuntu 22.04 or later recommended)
- Snort 3 installed and configured (including necessary rule sets)
- SnortML module (for running ML models within Snort)
- Python 3.8+ with ML libraries: scikit-learn, TensorFlow or PyTorch, numpy, pandas
- Network data: a PCAP folder or live traffic feed (e.g., from tcpdump)
- Basic understanding of networking concepts (TCP/IP, HTTP)
- Optional: agentic AI framework (e.g., LangChain, AutoGPT) for autonomy
Step-by-Step Guide
Step 1: Set Up Snort 3 with Machine Learning Support
Begin by preparing your Snort environment. Snort 3 offers improved performance and a plugin architecture that supports SnortML. First, update your system and install dependencies:
sudo apt update && sudo apt install -y build-essential cmake libpcap-dev libpcre3-dev libdumbnet-dev bison flex zlib1g-dev liblzma-dev openssl libssl-dev libnghttp2-dev libhwloc-devClone the Snort 3 repository from GitHub and compile it with ML support enabled:
git clone https://github.com/snort3/snort3.git && cd snort3
./configure --enable-ml
make && sudo make install
Tip: If you have a dedicated GPU, consider enabling CUDA acceleration for faster model inference.
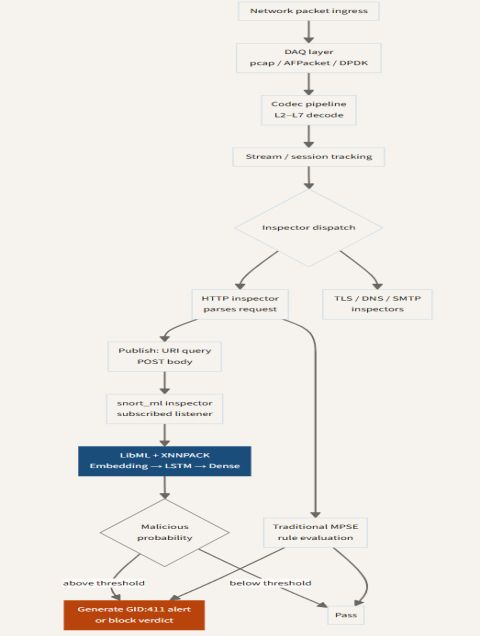
Step 2: Install and Configure SnortML
SnortML is a plugin that allows Snort to run machine learning models inline. Download the SnortML module from its repository and patch it into your Snort installation:
git clone https://github.com/snort3/snort3_extra.git
cd snort3_extra
./configure --with-snort=../snort3
make && sudo make install
Now, create a basic configuration file for SnortML, specifying the model path and threshold:
snortml {
  model /etc/snort/models/anomaly_detector.pb
  threshold 0.75
  context_window 200
}
This tells SnortML to load a TensorFlow model, alert when the anomaly score exceeds 0.75, and consider a context of 200 packets before making a decision.
Step 3: Train a Context-Aware Machine Learning Model
Signature-based detection lacks context. Build a model that learns normal behavior from your network traffic. First, collect a baseline of clean traffic (no attacks) and store as PCAP. Then, extract features such as packet inter-arrival times, payload entropy, and connection durations. Use Python to preprocess:
import pandas as pd
from scapy.all import *

packets = rdpcap('clean_traffic.pcap')
features = []
for pkt in packets:
    if IP in pkt:
        features.append({
            'length': len(pkt),
            'ttl': pkt[IP].ttl,
            'protocol': pkt[IP].proto,
            'payload_entropy': calculate_entropy(bytes(pkt.payload))
        })
df = pd.DataFrame(features)
Train an isolation forest or autoencoder on this data. For agentic AI, also label scenarios where the network behaves anomalously (e.g., port scans, DDoS). Save the model in a format compatible with SnortML (typically TensorFlow SavedModel or ONNX).
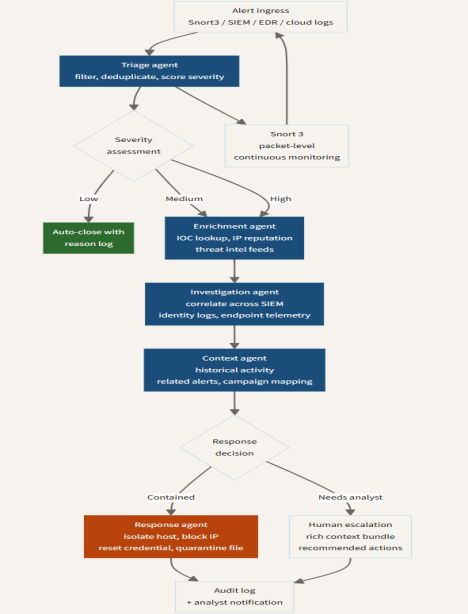
Step 4: Integrate Agentic AI for Autonomous Response
Agentic AI brings decision-making autonomy. Instead of just alerting, the system can—within defined boundaries—take action like dropping suspicious connections or reconfiguring firewall rules. Implement a simple agent using a loop that reads Snort alerts and triggers actions:
from langchain.agents import Tool, AgentExecutor
from langchain.llms import OpenAI

class SnortAgent:
    def __init__(self):
        self.llm = OpenAI(temperature=0)
        self.tools = [
            Tool(name='block_ip', func=lambda ip: os.system(f'iptables -A INPUT -s {ip} -j DROP')),
            Tool(name='log_alert', func=lambda msg: print(f'Alert: {msg}'))
        ]
        self.agent = AgentExecutor.from_agent_and_tools(tools=self.tools, llm=self.llm)

    def handle_alert(self, alert):
        if alert['severity'] > 8:
            self.agent.run(f'Block IP {alert["src_ip"]} for 10 minutes')
Attach this agent to a message queue (e.g., Kafka) that receives Snort alerts. The agent uses its LLM to reason about the context and decide on the most appropriate response.
Step 5: Test and Calibrate the System
Deploy your IDS in a controlled environment. Inject benign traffic mixed with known attack patterns (e.g., from the CICIDS2017 dataset). Monitor both Snort’s native alerts and SnortML’s ML-based detections. Adjust thresholds and retrain models to reduce false positives. For agentic responses, simulate scenarios and verify that actions are proportional and reversible.
Use a dashboard like Elastic Stack to visualize alerts and agent decisions. Create a feedback loop where false alarms are fed back into the training set to improve future predictions.
Tips for Success
- Start with a small dataset: Use a few hours of your busiest traffic to build a baseline model. Gradually expand to cover all network segments.
- Monitor model drift: Network behavior changes over time. Set up automatic retraining every week or month using new traffic samples.
- Human-in-the-loop: Begin with agentic responses requiring human confirmation for critical actions. Gradually increase autonomy as trust builds.
- Combine methods: Use signature-based rules for known threats and ML for anomalies. Agentic AI can orchestrate both sources to reduce alert fatigue.
- Security of the AI: Protect your ML models and agent logic from adversarial manipulation. Validate inputs to avoid evasion attacks.
Conclusion
The transition from signature-based to context-aware intrusion detection marks a new era in network security. By implementing SnortML and agentic AI, you empower your sensors to not only detect known patterns but also reason about whether traffic “makes sense” in real time. This step-by-step guide provides a practical path to building an adaptive IDS that learns, responds, and evolves. As the threat landscape grows more complex, embracing these architectures will be essential for staying ahead of adversaries.
Related Articles
- Vacuum Giant Dreame Unveils Smartphones in California, But Availability Remains Elusive
- How DAIMON Robotics Is Giving Robot Hands a Sense of Touch: An Expert Q&A
- Enterprise AI Takes Action: NVIDIA and ServiceNow Unite for Autonomous Agents
- Securing Autonomous AI Agents in CI/CD: GitHub's Defense-in-Depth Strategy
- Amazon Data Centers in Bahrain, UAE Crippled by Iranian Attacks; Repairs Expected to Take Months
- NVIDIA and ServiceNow Launch Autonomous AI Agents for Enterprise Workflows
- How to Launch a Personalization Program with a Prepersonalization Workshop
- 8 Reasons to Ditch Cloud-Based IR Control and Embrace a Local Solution